Making Makgeolli (막걸리)
I had my first taste of Makgeolli in Korea when my partner and I visited a Hanok Village in Andong. The village was quaint and rustic, but still charming in a simple, down-to-earth sort of way. It was surrounded by green hills and packed neatly with modest Hanok, divided by clay colored dirt roads and short walls of packed earth and ceramic tile. A shallow river with sandy banks calmly drifted by as cicadas croaked relentlessly in the trees.
After a day of walking around the village, and getting lost in its nooks and crannies, my companion and I secured lodging and walked to the edge of the village before dark to find something to eat. We settled on one of the local restaurants, and she took care of ordering the food. Shortly after, the customary array of side dishes were delivered to our table, followed by a steaming plate of Pajeon and a large bowl of milky white alcohol. This was Makgeolli; generously served with a deep spoon that is sometimes made from a dried gourd into a smaller, personal bowl and enjoyed alongside delicious food. While I'm not entirely sure, I think she had premeditated this meal in advance while we were wandering around the Hanok village. I can see why, since we devoured the food and slurped every last bit of the Makgeolli. I fell in love with Makgeolli sometime between then and when we were stumbling back to the Hanok village.
Makgeolli is a traditional Korean alcoholic beverage made from rice. Though related, it is not a type of Japanese Sake as it has its own taste and slightly different brewing methods. While it is identified as an unfiltered rice wine, it seems more like a rice beer to me, but stronger undiluted variants can be more like a wine (based on alcohol content). I'm not too familiar with the origins of Makgeolli in Korea, but I would like to learn the whole story, and any accompanying myths, eventually.
When I learned that Makgeolli is traditionally home made, I resolved to try making it myself. So here we are...
To get an idea of what was necessary, I started with videos on YouTube and eventually found my way to some posts on a home brew forum which detailed everything from equipment used to ingredient ratios. While I won't go through every detail since the links are provided below, I will talk about some things that I did differently, including successes and failures.
YouTube: zedomax and DOINGIN
homebrewtalk.com: geniz and SteveHoward
Batch 1: This batch was the most successful in my opinion, as it had the best taste and highest alcohol content. The ratio of 1:5:10 [nuruk : rice : water] suggested by geniz was used. I used a 1 gallon glass jar from Target, and attached a simple liquid crystal thermometer. One of my friends who has experience brewing suggested adding the thermometer to make temperature measurements easier and more sanitary. It ended up being the perfect size for the jar, and it was relatively cheap. He also stressed the need for everything to be super clean, as did the zedomax video, so all equipment was sanitized with boiling water and steam. While the sanitizing was successful, boiling can be pretty time consuming, especially with an already lengthy process.
The yeast used was Red Star Champagne yeast, as suggested by the guys at Barry's Home Brew since they had used it for sake before with good results. I also picked up a pack of dry ale yeast for experimenting later.
Since this batch was made in February, temperature was maintained by placing the jar in a cooler. Heat generated by the yeast was sufficient for keeping the temperature at 22-24 C, which pretty ideal. Any colder and the yeast won't do its thing, but too much heat will encourage mold to grow instead.
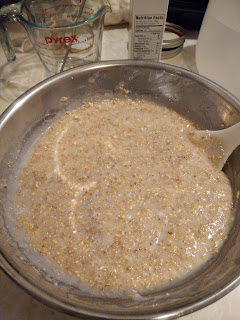
As you can see, by day 2 the yeast and nuruk enzymes were already hard at work as the rice was being broken down, which made the water cloudy with particulate.
Day 3 was a more drastic change, with consistent bubbling and a somewhat strong alcohol scent. Separation of the mixture was more visible; the rice and nuruk sank to the bottom as most of the liquid floated to the surface.
Finally, day 4 was the end of the brew, as the temperature settled down to around 22 C and the bubbling became more inconsistent. The smell was distinctly alcoholic and the taste was authentic; or so my Korean fiance said, and that's enough approval for me.
Bottling proved to be a mess of boiled utensils and cheesecloth, but it turned out well in the end. We stirred the Makgeolli to ensure an even mixture, and poured it into the bottles with a small funnel. This batch was not sweetened during bottling, which makes the taste smoother but causes more carbonation to build up inside the bottle. Instead we sweetened the drinks as they were served with a bit of honey. I think this batch turned out great, and had an awesome taste with considerable alcohol content. One thing I suggest is not using cheesecloth to strain the Makgeolli as it is a pain to clean.
Batch 2: Not bad overall, but a recipe confusion caused me to use a different ratio which had a more sour taste with less alcohol content. Actually, I was surprised by how fast the yeast fermented the rice, because it only took two days for the separation of the alcohol and particulate to become apparent.
Other things different with this batch were the sanitation method (sanitizer instead of boiling) and the yeast used, or rather reused. Only half of the Red Star Champagne was used for Attempt 1, so the other half was used here. It did proof without a problem, but I think I want to use fresh yeast for subsequent attempts. That way I can ensure some degree of consistency.
This batch was back sweetened to combat some of the sourness. Unfortunately, this let to me having to vent the jars every day so they didn't explode in the fridge from too much pressure. On one of the venting sessions my swing top growler bottle popped open with a surprising amount of force and sheared the lip right off of the top of the bottle. That kind of bottle isn't really designed for that high pressure, so I think I'll stick with mason jars from now on.
Batch 3: This batch was all about trying things differently. I kept the 1:5:10 ratio since it produced a better taste than the 1:2:3.2 ratio from the second batch. The differences were the rice used, 1/3 of which was sweet black rice, and the yeast being the ale yeast mentioned above.
The first two days of fermentation went well; temperature stayed pretty constant and the yeast was obviously active in breaking down the rice. On the third day I noticed some filmy white residue, which made me nervous as to the presence of mold so I kept a close eye on it. By day 4 it was ready to bottle, but I still wasn't sure about the residue. As a precaution I used a coffee filter to soak up the top layer of the liquid and any floating mystery bits. The rest of the Makgeolli looked pretty clean so I bottled it after sanitizing the mason jars. After a few days in the fridge I will test them to make sure they are safe. I would normally have tossed the batch, but I did find someone who still bottled after their brew grew mold on the top layer, because they drained the container from the bottom. They said it was one of their best batches.
That is a summary of my Makgeolli experiments thus far. It really is a wonderful drink. Someday I would like to learn from a Makgeolli master while traveling in Korea, but until then I'll be testing in my kitchen.
15.5.2012 Update
The black rice batch turned out pretty good, although it was a bit on the weak side. The mold was no problem and taste improved after about 5 days in the refrigerator :D.
After a day of walking around the village, and getting lost in its nooks and crannies, my companion and I secured lodging and walked to the edge of the village before dark to find something to eat. We settled on one of the local restaurants, and she took care of ordering the food. Shortly after, the customary array of side dishes were delivered to our table, followed by a steaming plate of Pajeon and a large bowl of milky white alcohol. This was Makgeolli; generously served with a deep spoon that is sometimes made from a dried gourd into a smaller, personal bowl and enjoyed alongside delicious food. While I'm not entirely sure, I think she had premeditated this meal in advance while we were wandering around the Hanok village. I can see why, since we devoured the food and slurped every last bit of the Makgeolli. I fell in love with Makgeolli sometime between then and when we were stumbling back to the Hanok village.
Makgeolli is a traditional Korean alcoholic beverage made from rice. Though related, it is not a type of Japanese Sake as it has its own taste and slightly different brewing methods. While it is identified as an unfiltered rice wine, it seems more like a rice beer to me, but stronger undiluted variants can be more like a wine (based on alcohol content). I'm not too familiar with the origins of Makgeolli in Korea, but I would like to learn the whole story, and any accompanying myths, eventually.
When I learned that Makgeolli is traditionally home made, I resolved to try making it myself. So here we are...
To get an idea of what was necessary, I started with videos on YouTube and eventually found my way to some posts on a home brew forum which detailed everything from equipment used to ingredient ratios. While I won't go through every detail since the links are provided below, I will talk about some things that I did differently, including successes and failures.
YouTube: zedomax and DOINGIN
homebrewtalk.com: geniz and SteveHoward
 |
| Batch 1 - day 2 |
The yeast used was Red Star Champagne yeast, as suggested by the guys at Barry's Home Brew since they had used it for sake before with good results. I also picked up a pack of dry ale yeast for experimenting later.
 |
| Batch 1 - day 3 |
As you can see, by day 2 the yeast and nuruk enzymes were already hard at work as the rice was being broken down, which made the water cloudy with particulate.
Day 3 was a more drastic change, with consistent bubbling and a somewhat strong alcohol scent. Separation of the mixture was more visible; the rice and nuruk sank to the bottom as most of the liquid floated to the surface.
Finally, day 4 was the end of the brew, as the temperature settled down to around 22 C and the bubbling became more inconsistent. The smell was distinctly alcoholic and the taste was authentic; or so my Korean fiance said, and that's enough approval for me.
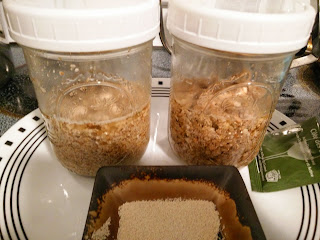
Bottling proved to be a mess of boiled utensils and cheesecloth, but it turned out well in the end. We stirred the Makgeolli to ensure an even mixture, and poured it into the bottles with a small funnel. This batch was not sweetened during bottling, which makes the taste smoother but causes more carbonation to build up inside the bottle. Instead we sweetened the drinks as they were served with a bit of honey. I think this batch turned out great, and had an awesome taste with considerable alcohol content. One thing I suggest is not using cheesecloth to strain the Makgeolli as it is a pain to clean.
 |
| Batch 1 - day 4; Time for bottling |
 |
| Batch 1 - bottled Makgeolli |
 |
| Batch 2 - day 2 |
Other things different with this batch were the sanitation method (sanitizer instead of boiling) and the yeast used, or rather reused. Only half of the Red Star Champagne was used for Attempt 1, so the other half was used here. It did proof without a problem, but I think I want to use fresh yeast for subsequent attempts. That way I can ensure some degree of consistency.
 |
| Batch 2 - day 3 before bottling |
This batch was back sweetened to combat some of the sourness. Unfortunately, this let to me having to vent the jars every day so they didn't explode in the fridge from too much pressure. On one of the venting sessions my swing top growler bottle popped open with a surprising amount of force and sheared the lip right off of the top of the bottle. That kind of bottle isn't really designed for that high pressure, so I think I'll stick with mason jars from now on.
Batch 3: This batch was all about trying things differently. I kept the 1:5:10 ratio since it produced a better taste than the 1:2:3.2 ratio from the second batch. The differences were the rice used, 1/3 of which was sweet black rice, and the yeast being the ale yeast mentioned above.
 |
| Batch 3 - day 2 |
The first two days of fermentation went well; temperature stayed pretty constant and the yeast was obviously active in breaking down the rice. On the third day I noticed some filmy white residue, which made me nervous as to the presence of mold so I kept a close eye on it. By day 4 it was ready to bottle, but I still wasn't sure about the residue. As a precaution I used a coffee filter to soak up the top layer of the liquid and any floating mystery bits. The rest of the Makgeolli looked pretty clean so I bottled it after sanitizing the mason jars. After a few days in the fridge I will test them to make sure they are safe. I would normally have tossed the batch, but I did find someone who still bottled after their brew grew mold on the top layer, because they drained the container from the bottom. They said it was one of their best batches.
That is a summary of my Makgeolli experiments thus far. It really is a wonderful drink. Someday I would like to learn from a Makgeolli master while traveling in Korea, but until then I'll be testing in my kitchen.
15.5.2012 Update
The black rice batch turned out pretty good, although it was a bit on the weak side. The mold was no problem and taste improved after about 5 days in the refrigerator :D.
Comments
Post a Comment