Making Makgeolli, the Korean Edition
Making Makgeolli, the Korean Edition!
한국에서 막걸리 만들자~
I continued my interests in making makgeolli while working here in Korea. I couldn't possibly have a better opportunity to understand the beverage and learn the many variations and nuances on how it is made. Thankfully there have been several books published on the topic of makgeolli home brew. Fortunately, I have a loving fiance who is patient and willing to translate and help me understand the books, which are written in Korean. Maybe when my Korean skill gets better I'll work at an English translation of the book(s).I started by visiting the book store and picking up a book which seemed to have a clear process and interpretation of each recipe. The book classified the different types of makgeolli and discussed their characteristics quite extensively. I will get into an explanation of types later, and for now I will stick to a basic recipe.
The book also listed the most common and most useful tools for making makgeolli. They are as follows:
- Large pot for boiling water
- Rice steamer; preferably one that matches the size of the pot.
- Rice paddle; 주걱 or しゃもじ.
- Cloth for steaming the rice.
- Bamboo lattice basket which fits inside of the onggi; the purpose is to separate the large chunks of rice particulate from the makgeolli when serving directly from the onggi. This isn't necessary if you are bottling.
- Sieve for draining rice/ bottling.
- Funnels
- Thermometer for measuring rice/liquid temperatures.
- Kettle for boiling and pouring water
- Pitcher/measuring cup for measuring volume.
Some additional items that I found useful:
- Sterilization equipment; there are many methods of sterilization, so use those methods which work best for you.
- Onggi; Korean earthenware pots.
- Bottles for bottling; any kind with a seal should do, but if you plan to back sweeten when you bottle, stay away from swing-top growlers unless you can reliably vent the pressure. The brand Lock&Lock puts out a decent line of glass jars that have a spring-loaded pressure release valve, which negates the risk of bottle-bombs.
- Large stainless-steel bowls
- A heating pad or insulated box, such as a cooler, to regulate temperature in the cold months.
On to...
The Recipe:
This recipe is for a type of makgeolli called Samyang-ju 삼양주. I'm not sure what "yang" means, but "sam" is three and "ju" is alcohol. I think the name comes from the number of steps, batches, or feeds that are used in making this makgeolli. First, a starter batch is made (주모1), followed by a second batch, which is made and then combined with the first batch (주모2). Finally, the final feeding is added to the second batch to make the final product (덧술) which then ferments until it is ready. If all goes well, you can have delicious makgeolli in 7-10 days.
Wow, you really only need three...
Ingredients
The ingredients are typically some kind of rice, a yeast or enzyme, and water. There can be variations with other ingredients to give a particular flavor, too.
For this recipe, two kinds of rice are used. The first kind is a glutinous/sweet rice flour (멥쌀), while the second kind is just plain glutinous/sweet rice (찹쌀). It is important that the rice flour does not contain salt. Some manufacturers use salt in the process of making rice flour, so please take that into consideration. Salt will hinder/prevent the development of micro-organisms that make makgeolli what it is.
Also, an ingredient called nuruk (누룩가루) is used in the cultivation of micro-organisms. Nuruk comes in 2 forms: a brick and a coarse powder. For this recipe the powder is used. It may be necessary to use a mortar and pestle, coffee bean grinder, etc. to get the nuruk to a good consistency. It doesn't have to be a fine dust, but it should be easily incorporated into the rice when mixed.
Lastly, boiled water is used for parts 1 and 2 of this recipe. Part 3 does not specifically contain water, except that used in the steaming of the sweet rice. However, it may be necessary to add additional water while the last batch ferments.
The amount of ingredients used is as follows:
- Batch 1 (주모1)
- glutinous rice flour - 1 liter (800 g)
- nuruk - 400 g
- water - 2.5 liters
- Batch 2 (주모2)
- glutinous rice flour - 1 liter
- water - 2.5 liters
- Batch 3 (덧술)
- steamed glutinous rice - 5 liters (4 kg)
The Procedure
Follow good manufacturing and cooking processes and sterilize your equipment, especially if you are serving to others. I think this is a given so I won't talk about it in the procedure; however, if you have a question, please ask.
- Batch 1
- Bring the water to a boil.
- While the water is coming to a boil, measure the rice flour into a large bowl and the nuruk into a separate bowl.
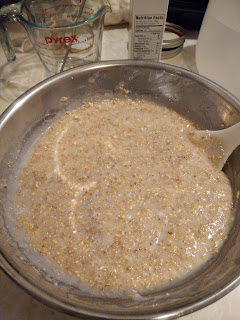
- Once the water boils, add it to the rice flour in increments. Stir the rice flour well to mix in the hot water. You are essentially cooking the rice flour with the boiling water.
- After all of the water is mixed into the rice flour, stir until lumps are gone or not visible.
- Let the cooked rice flour cool to 25 C.
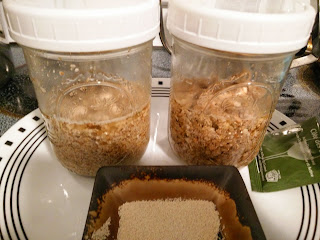
- At 25 C, add the nuruk to the mixture and mix with your hands. Try to break up any large clumps or nuruk particles. Mix for about 30 minutes with your hands.
- Transfer the water/flour/nuruk mixture to your onggi or fermentation container. Keep it at 25 C for 36-48 hours. Check every 12 hours or so for signs of mold/spoilage. It will smell sour, but it shouldn't be disgustingly sour.
- Batch 2
- Bring the water to a boil.
- While the water is coming to a boil, measure the rice flour into a large bowl.
- Once the water boils, add it to the rice flour in increments. Stir well to mix in the hot water until limps are gone or not visible.
- Let the cooked rice flour cool to 25 C.
- At 25 C, add Batch 1 and mix thoroughly. You do not have to mix for 30 minutes, just until the new rice flour is incorporated into Batch 1.
- Transfer the newly made Batch 2 back into your onggi or fermentation container. Keep it at 25 C for 24-48 hours. Check every 12 hours or so for signs of mold/spoilage. At this stage it should noticeably smell like alcohol.
- Batch 3
- Bring water to a boil; enough to steam the amount of rice you are using.
- While the water is coming to a boil, moisten the cloth being used for steaming rice and place inside the steamer. If you are using the cloth for the first time, boil it at least once to remove any dust/dyes that could seep into your rice.
- Measure the dry rice and place into the steamer once the water has begun to boil.
- Steam until the rice is cooked.
- Remove the rice from the steamer and place on a flat, ventilated surface for cooling. It helps if you can elevate the cooling surface on top of a few wood blocks.
- Once the rice cools to 25 C, add it and Batch 2 into a large bowl and mix well with your hands.
- Place the new mixture back into onggi or fermentation container. Keep it at 25 C for 48-72 hours. Check on it every 12 hours or so for signs of mold/spoilage.
- After 24-36 hours, the rice should noticeably start to separate from the liquid. As the makgeolli ferments and the micro-organism eat the rice, the eaten rice will sink to the bottom of the container. When the makgeolli is ready, the majority of the rice will have sunk to the bottom of the container and it will appear as if the alcohol has gathered at the surface. There may also be a thin layer of rice still floating at the top, which is also acceptable.
 |
| Completed Samyang-ju |
If you have any suggestions or questions, please post a comment below.
Comments
Post a Comment