First brew in the new hangari
On Sunday I started a fresh brew in the new hangari.
What's a hangari? You can find out the basics in my last post here.

If you are interested in the brand of rice, type of water, nuruk, etc. please leave a comment below and I'll be happy to provide more details. For sweetening, honey and brown rice syrup are used.
In the morning the rice was drained and steamed in a deep pot with a steamer basket. I have a cheesecloth that I use for steaming rice.
What's a hangari? You can find out the basics in my last post here.
Ingredients
I am continuing to use the following ratio, which was taken from the book Making, Drinking, and Enjoying Makgeolli.If you are interested in the brand of rice, type of water, nuruk, etc. please leave a comment below and I'll be happy to provide more details. For sweetening, honey and brown rice syrup are used.
Process
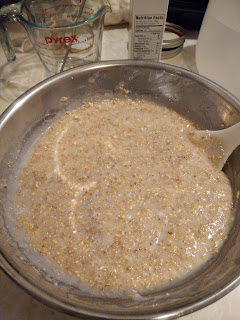
The brew started by preparing the rice. The rice was washed by running water over the rice while swooshing it around in a metal colander. A pot was placed under the rice to periodically check the color of the water running through the rice. When the water was mostly clear the rice was moved to a clean pot, which was filled with enough water to cover the rice. The uncooked rice soaked overnight.
TIP: Do not double up the cheesecloth if it is too large. Making the cloth too thick will inhibit the rice from cooking properly and you may end up with a raw center. Instead, use a single layer of cloth and just let the excess hang out at the top of the steamer.
I was going for the right godu-bap texture, which T. Verraes described as "like play-dough" in a previous comment. I think the proper texture was achieved after about 30 minutes of steaming. I could squeeze the grains between my fingers and they would deform, but they wouldn't pop.
While the rice was draining the nuruk was soaked and set aside. It should soak for at least 3 hours, after which it becomes like a gritty mud.
The rice was cooled to room temperature by spreading it out on cooling racks.
When it came time to mix, the yeast was activated in the wet nuruk mixture for 15 minutes.
The cooled rice was moved to the hangari and the yeast-nuruk mixture was added and mixed by hand. After a few minutes of mixing, the additional water was added in 4 parts while mixing continuously. When I felt the mixing was done, the hangari was set in a quiet place out of direct sunlight. I expect it to maintain a pretty constant temperature of about 25 C, even on the hotter days. This is due to the thick clay that it is made from. See the pictures below.


Day 1
 Day 2
Day 2
 Day 3
Day 3
 Day 4
Day 4
 Day 5
Day 5
 Day 6
Day 6

 Overall the brew yielded 4 liters of makgeolli, with a little extra left over to make bread. This was using a full kg of rice with the above ratio.
 |
| Today's little helper |
Fermentation
The brew was stirred once a day with a sterile spoon until the fermentation was complete.Day 1
Bottling
After 6 days the makgeolli was ready to bottle. The bottling process involved straining, sweetening, and diluting. First the makgeolli was strained through a fine filter into a large bowl. Next, it was sweetened to the ratio of 1 tablespoon of sweetener per serving. I counted one serving as 200 ml and each bottle contains 1 liter, so that 5 tablespoons per bottle. Honey and brown rice syrup were used to sweeten, and the sweeteners were first dissolved in warm water to ensure a consistent mix. Finally, the makgeolli was diluted 1:1 with the sweetened water. This is the result, a creamy ivory and tan makgeolli: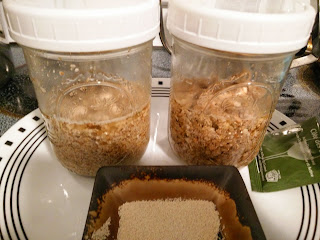
Comments
Post a Comment